ここでは、実際に座標系をあわせる作業をPythonのスクリプトを使って行います。
座標系の定義の例
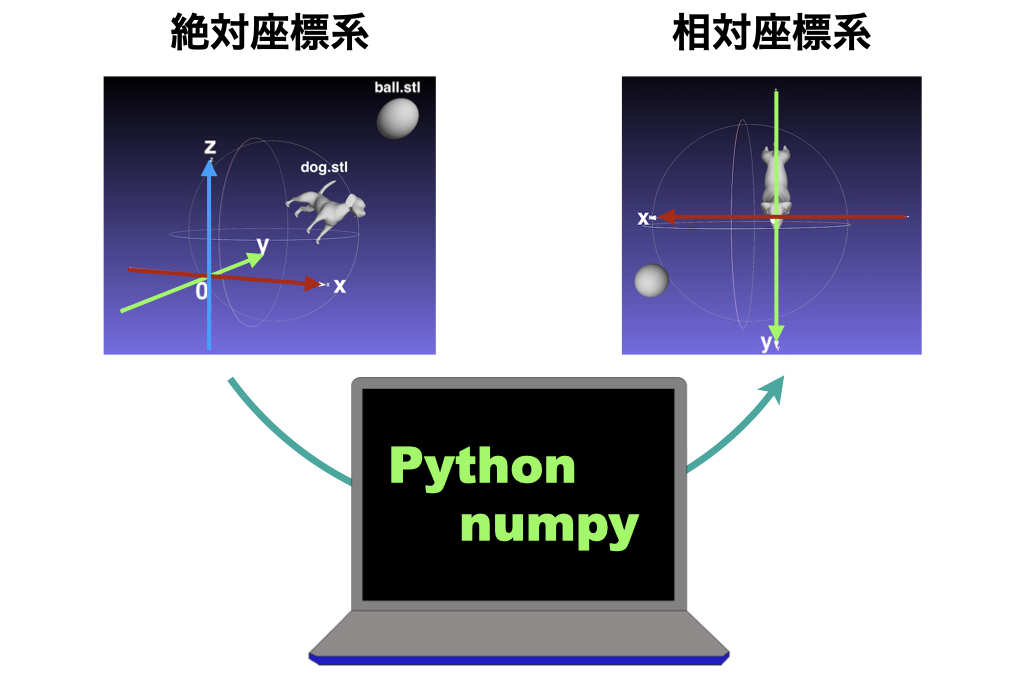
例として、以下のような犬の表面データモデルを考えます。
あわせボールの表面データもおいておきます。
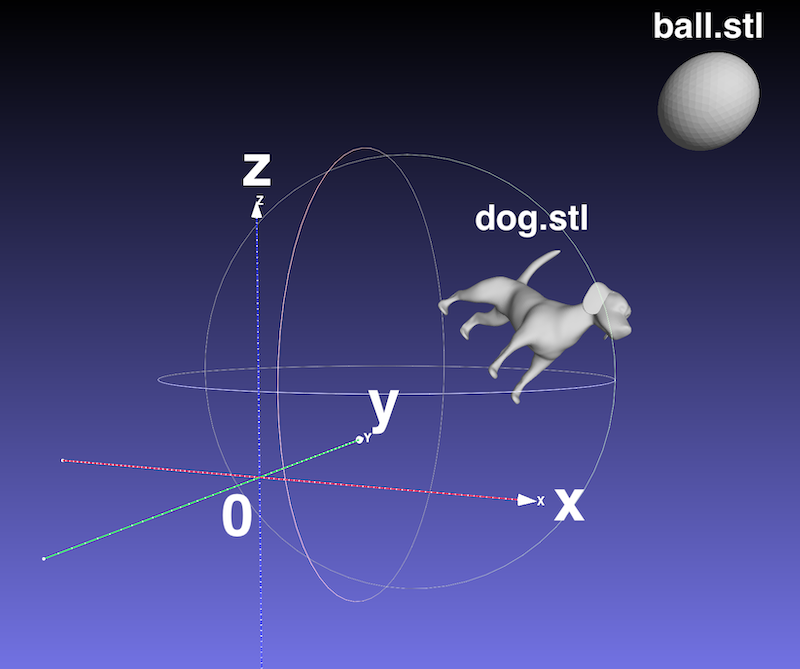
犬のデータはfree3d.comよりダウンロード
表示されているx, y, z軸はあらかじめ決まっている絶対座標での軸です。
この軸からだけでは、犬からボールの方向、位置は正確に表せません。
そのため、絶対座標を犬からみた座標に合わせます。
ここでは例として
参照点として、犬の
右目、左目、鼻、しっぽを使います。
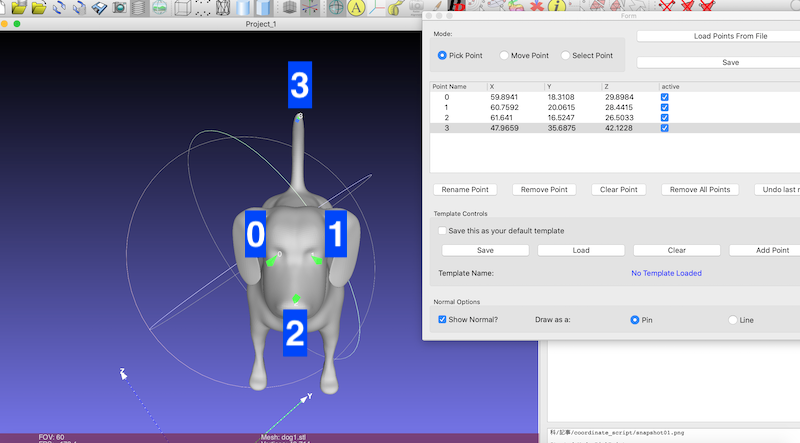
Meshlab上で点データを右目、左目、鼻、しっぽの順に点をとります。
「dog.pp」
として保存します。
<!DOCTYPE PickedPoints>
<PickedPoints>
<DocumentData>
<DateTime date=”2021-09-24″ time=”18:20:14″/>
<User name=”programming”/>
<DataFileName name=”dog1.stl”/>
<templateName name=””/>
</DocumentData>
<point name=”0″ z=”29.898438″ y=”18.310822″ active=”1″ x=”59.894138″/>
<point name=”1″ z=”28.441479″ y=”20.061543″ active=”1″ x=”60.759193″/>
<point name=”2″ z=”26.503325″ y=”16.524706″ active=”1″ x=”61.641022″/>
<point name=”3″ z=”42.122772″ y=”35.687466″ active=”1″ x=”47.965927″/>
</PickedPoints>
犬のローカル座標として、
原点:犬の両眼の間
x軸:犬の左目 → 右目を結ぶ線
z軸:x軸と、「犬のしっぽから鼻にむかう直線」の2つに垂直
y軸:x, z軸に垂直
とします。
「犬のしっぽから鼻にむかう直線」をy軸にしたいところですが、
そうなるとx軸とy軸が直交していることが確約されなくなってしまうため、このような軸のとり方をします。
スクリプト
前ページの座標変換の式
\(
^{G}R_L =
\left(
\begin{array}{ccc|c}
& & &\\
\overrightarrow{e_{xL}} &\overrightarrow{e_{yL}} & \overrightarrow{e_{zL}} & \large{t}\\
& & & \\
\hline
& \large{0} & & \large{1}
\end{array}
\right)
\)
※ \(^{G}R_L\) はローカル座標系(L)から絶対座標系(G)への4×4変換行列
\(
^{L}R_G =
\left(
\begin{array}{ccc|c}
& \overrightarrow{e_{xL}} & &\\
& \overrightarrow{e_{yL}} & & \ -\ ^{L}Rot_G \cdot t\\
& \overrightarrow{e_{zL}} & & \\
\hline
& \large{0} & & \large{1}
\end{array}
\right)
\)
※ \(^{L}R_G\) は絶対座標系(G)からローカル座標系(L)への4×4変換行列
上の式で
\(^{L}Rot_G = \left(
\begin{array}{c}
\overrightarrow{e_{xL}} \\
\overrightarrow{e_{yL}} \\
\overrightarrow{e_{zL}}
\end{array}
\right)\)
※ \(^{L}Rot_G\) は絶対座標系(G)からローカル座標系(L)への3×3回転行列
使用してスクリプト
“dog_axis.py”
を書きます。
import numpy as np

def main(right_eye, left_eye, nose, tail):
    origin = (right_eye + left_eye) / 2
    #原点を両目の中点とする
    px = right_eye - left_eye
    # x軸は左目→右目
    py = nose - tail
    # 「しっぽから鼻にむかう直線」

    """それぞれの単位ベクトルを計算"""
    ex = px / np.linalg.norm(px)
    ez = np.cross(px, py) / np.linalg.norm(np.cross(px, py))
    ey = np.cross(ez, ex)

    """変換行列 4x4 を作成"""
    #ローカル座標(犬から見た座標)を絶対座標に変換する行列
    R_LtoG = np.identity(4)

    R_LtoG[:3, :3] = np.array([ex, ey, ez]).T
    #回転行列を代入
    R_LtoG[:3, 3] = origin
    #移動ベクトルを代入

    #絶対座標からローカル座標(犬からみた座標)に変換する行列
    R_GtoL = np.identity(4)
    R_GtoL[:3, :3] = np.array([ex, ey, ez])
    R_GtoL[:3, 3] = - np.dot(np.array([ex, ey, ez]), origin)

    return (R_GtoL, R_LtoG)
外から呼び出します。
Meshlabで読み取った点を使用するため、
Meshlabの.ppファイルを読み取れるスクリプトを使います。
from stl import mesh

import dog_axis
import point_class    #Meshlabのポイントを読み込むモジュール

"""Meshlabの点を読み込む"""
dog_points = point_class.MeshlabPp('dog.pp')
right_eye = dog_points.point_list[0]
left_eye = dog_points.point_list[1]
nose = dog_points.point_list[2]
tail = dog_points.point_list[3]

R_GtoL, R_LtoG = dog_axis.main(right_eye, left_eye, nose, tail)
print(R_GtoL)
#[[ -0.35505373  -0.71856705   0.59799519  17.76227135]
# [  0.47873701  -0.68918876  -0.54390232   0.20790221]
# [  0.80296185   0.09316788   0.58870368 -67.40000847]
# [  0.           0.           0.           1.        ]]
print(R_LtoG)
#[[-0.35505373  0.47873701  0.80296185 60.3266655 ]
# [-0.71856705 -0.68918876  0.09316788 19.1861825 ]
# [ 0.59799519 -0.54390232  0.58870368 29.1699585 ]
# [ 0.          0.          0.          1.        ]]

"""numpy.stlを使って犬のローカル座標に表面データを移動"""
dog_stl = mesh.Mesh.from_file('dog.stl')
ball_stl = mesh.Mesh.from_file('ball.stl')

dog_stl.transform(R_GtoL)
ball_stl.transform(R_GtoL)

dog_stl.save('dog_local.stl')
ball_stl.save('ball_local.stl')

犬を中心とした座標系に犬の表面データとボールの表面データが移動されます。
この座標系でいろいろ計測すれば、犬からの位置関係としての値が計算できるというわけです。
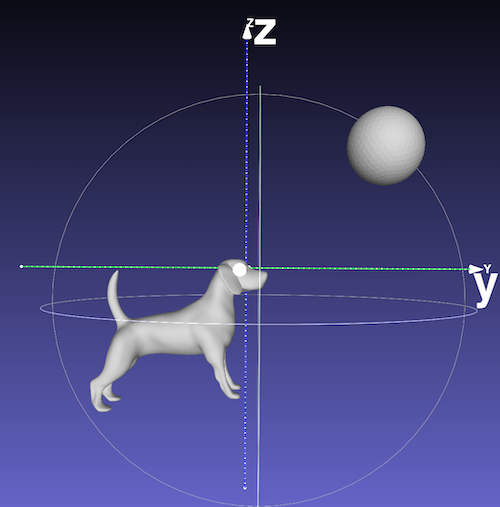
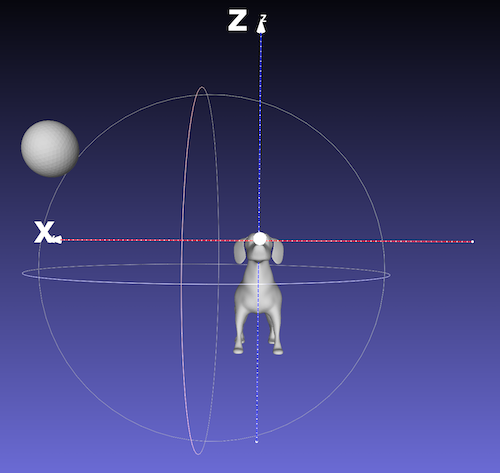
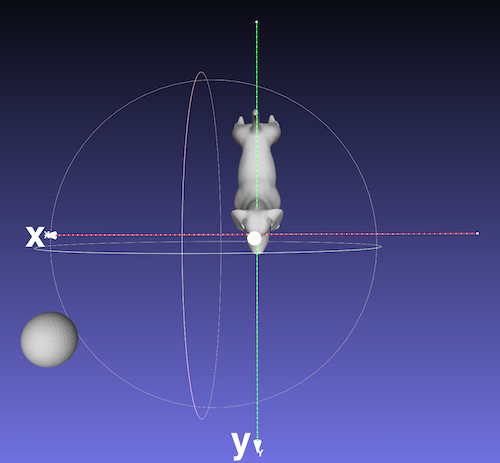
正確な位置が出したければ、ローカル犬座標でのボールの座標を求めます。
numpy-stlには重心を出す方法がありますので、
from stl import mesh

ball_local = mesh.Mesh.from_file('ball_local.stl')
volume, cog, inertia = ball_local.get_mass_properties()
# cog : center of gravity(重心)
print(cog)
#[37.40975436 18.7481968  16.09440369]
ボールの位置は
- 37.4 x軸方向(右方向)
- 18.7 y軸方向(前方向)
- 16.1 z軸方向(上方向)
にあります。
と客観的に表すことができます。
